Monday, June 9, 2014

Sour Cream Rhubarb Pie

Thumbing through the recipe file at a timely moment.  Lots of rhubarb on hand and up pops a recipe for Sour Cream Rhubarb Pie.  Terrific!


Bet made her basic pie crust, which makes four crusts or two top and bottoms.


Country Tea Room Pastry
  • 4 cups unbleached unbromated flour
  • 1 Tbs sugar
  • 1-1/2 tsps salt
  • 1 cup butter
  • 1/2 cup coconut oil
  • 1 egg
  • 1 Tbs vinegar
  • 1/2 cup cold water
Mix flour, sugar and salt.  Cut in the cold butter and room temperature coconut oil.  Set aside.  Mix the water, egg and vinegar.  Slowly mix the fluid into the flour mixture and form into a ball.  Divide the ball into four and chill.

Sour Cream Rhubarb filling:
  • 2c rhubarb or more diced
  • Scant cup of sugar (original recipe calls for 1-1/2, but the scant cup was plenty)
  • 1/4 tsp salt
  • 2 Tbs tapioca
  • 1/2 cup sour cream
  • 1/2 to 1 tsp almond extract (the original recipe calls for 3 chopped maraschino cherries and a Tbs of the juice, but we have learned that maraschino cherries are basically poison.  We no longer eat poison)
Mix all the ingredients together and pour into a uncooked shell.  Place the top crust on, crimp edges, slash for steam release, brush with a well beaten egg.  Bake at 350 degrees until bubbly.  (about 30 (that is what the recipe says to about 45 min)

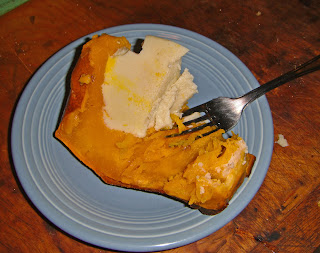
The pie in these pictures is Bet's huckleberry version.

To the filling she added approximately 2 cups of drained huckleberries, reserve the liquid, reduce the huckleberry juice on the stove top until syrupy.  Increased the tapioca to 3 Tbs (but this pie is still a bit runny so try 4 Tbs).  When baking with berries we often add a bit of lemon juice to really brighten the berry flavor.  She added approximately 1 tsp, maybe 1-1/2 tsp.  It seems odd with the sour cream and you could leave it out.  But this second pie really had a lot of flavor.  She did make sure this pie had a full cup of sugar instead of a scant cup.  

We will be making more of this recipe and will update this post with any changes.  

Tuesday, November 26, 2013

Carrot Casserole

A holiday favorite of the Vick family.  The original recipe is all about processed cheese.  So we’ve remade the recipe to have the least offensive ingredients.
4 c carrots lightly cooked, set aside
2/3 c chopped onion sauteed in
3T butter
3 T flour sifted into the onion butter mix and whisked to make a roux
When the flour is lightly brown slowly  add
1-1/2 c milk  whisk into the roux until warm and bubbly, add
1/2 tsp salt
1/4 tsp black pepper
8 oz cream cheese chunked up so it melts faster
1 c mixed shredded cheeses – chedder, parmesan, even gouda
Once the cheese is nicely blended,
Mix the cheese sauce into the carrots and hen put all into a buttered casserole pan
Sprinkle the top with buttered seasoned bread crumbs.

In the past we have added more onion, cut back on the carrots and added red peppers in to the onion saute.   And boy howdy that was nice.

The year we took a recipe off the internet and turned out to be butter soup (we found that there is such a thing as too much butter) that recipe also called for 1/4 tsp dry mustard and 1/4 tsp celery salt which were nice additions into the cheese sauce.  It makes me think that some finely minced celery in with the onion could be delightful.  Celery and carrot are lovely together, it is after all the combination known as mirepoix, aka, the holy trinity of cooking.  In nearly every cooking tradition there is a form of mirepoix, but carrot, onion and celery is classic French so how bad could it be to add celery into our favorite way to cook a carrot?

Sunday, November 4, 2012

Pumpkin Custard

First off, I can't believe that I have not posted here in over a year and a half...  


But now I'm back with the best pumpkin custard ever!  And it isn't what you'd expect when you hear "pumpkin custard".  Pumpkin custard could invoke images of pureed pumpkin stirred into a yummy milk, egg, and sugar mixture and baked not in a pie shell like its cousin pumpkin pie but instead in a souffle dish as it sits in a pan of water in the oven.

Well strike that image from your mind, that is not this "Pumpkin Custard".  This custard doesn't have pumpkin in it; this custard is in the pumpkin!  That means no prebaking the pumpkin, scraping the cooked meat from the shell and then pureeing it in the food processor.  A whole afternoon rescued! 


And it is sooo good too, definitely good.  Even f0ur days later. 

So like the original recipe post-er stated, it is a long baking time (90 minutes) but you don't have to also bake the pumpkin first.  Another note about the original recipe, it is call Thai Pumpkin Custard.  I was hoping for a spicy pumpkin custard by googling Thai with pumpkin custard but when this one came up I couldn't resist.  What makes it Thai?  Coconut milk instead of dairy.  Amd yes Dear Reader, pumpkins and winter squashes are popular in Asia.  In fact Baker Creek Heirloom Seeds carries one called Thai Pumkin that I'm going to grow next year  and several other varieties of winter squash that come from Asia.  But use a pumpkin or squash that has an ample cavity.  (I don't think Thai Pumpkin does.)


And it is sooo good too, definitely good. Even f0ur days later.  I made this for a Halloween gathering and everyone who ate it loved it, or at least they said so.  I think the whole coconut milk thing made Dirt afraid of it (he is still claiming to hate coconut in spite of having enjoyed things made with coconut).    Bet nor I could actually taste coconut.   I don't think he would have known about the coconut except that I had him purchase it for me, so he set his jaw against it from the get go. 

To make this you will need:

A pumpkin, a nice medium sized pie pumpkin is perfect, though I'm thinking of trying some of my other winter squashes as well.    I used one of my Winter Luxury Pie pumpkins, it has good flavor and it isn't watery, but it is a netted pumpkin, which was okay, it just lacked something in presentation.

One 13.66 oz. can of coconut milk - not "lite" and not coconut cream.

Nine eggs.  Yep, nine.

One cup of sugar. (The original recipe calls for two cups, the author says it needs it for the bitter pumpkin, I don't think so and no one else who ate ours thought it needed to be sweeter and in fact after eating the last slice this morning, I was thinking it could even be less sweet.)

A pinch of salt.

Two teaspoons of vanilla.   I asked Bet to double it, I'm fairly certain she did, she said she just glurged the vanilla in without measuring.

You will also need a cookie sheet to bake the pumpkin on and an oven set at 375 degrees.  (I'm going to try it in a crock pot soon, I'll let you know how it turns out.)


To make it, you open up the pumpkin like you are starting a Jack O'Lantern and scoop the seeds and stringy insides out, but don't cut into the flesh. Save the top if you want for presentation (it will be baked for half the time on the sheet next to the filled pumpkin.

Put the shell on the cookie sheet.  If you're worried about the shell leaking (it shouldn't) you can use a bar or cake pan.  Place the lid, if you are using it, on the sheet stem up.

Beat the eggs till light.  Mix in the rest of the ingredients and pour into the pumpkin
 shell. 

Bake this puppy in your oven at 375 degrees for an hour and a half.  Take the lid out after forty-five minutes and check the pumpkin and the custard at an hour fifteen minutes.  If the shell is done but the custard isn't (test it the same way you test pumpkin pie - a butter knife inserted carefully into the middle of the custard and if it comes out clean the custard is done.  I used a cake tester on the shell - smaller hole, easier time piercing the skin.)  I would suggest putting a foil tent on the pumpkin so it doesn't burn.  I might even be tempted to make a cape for my pumpkin shell and put it on when I take the lid out or even put it on from the very beginning.  But I would leave a wide opening at the top to match the hole so that the custard cooks properly and has a lovely brown crust.

Make sure you have a formidable spatula or two good ones and maybe some help to lift the pumpkin off the sheet and onto a serving plate.  Cool the Pumpkin Custard, then slice and enjoy!  Once again there were suggestions made on the original that we didn't follow, the author suggests a droozle of maple syrup (hmm this could be her source of bitter) or favorite liquor.  I'm not saying that either one of these would not be fabulous additions, whipped cream would be too, I'm just saying, it didn't need it!-       


Friday, February 11, 2011

A Busy Friday!

CIMG2277


Not a lot of time on either end of the day, so crock pot it is. Chopped up five small onions - I feel the need for the magic of alliums, put in about a quarter cup of dried celery, a third cup of dried red pepper, a palm of (that's a good amount in the palm of my hand, not full mind you) of this and that: basil, marjoram, thyme, and tarragon.


CIMG2276


I stuffed a large tea ball with some spices that I want to taste but not chew, a teaspoon or so of: peppercorns, juniper berries, mustard seed, rosemary, and three bay leaves smooched all that lays on the bottom of the crock, oh with lots of garlic, and then a semi thawed top round steak gets laid upon all that, I tuck the bone under the meat to make sure we get all the marrowy goodness into the broth. About a quart of water in on that making sure the meat is covered and on goes the lid.


Anna couldn't figure out from the yesterday's videos, how to get the two colors started so here is another video that hopefully will explain the process of adding in the two colors. It is freaky because the yarns seem so loose but it's okay, they will tighten up and stay put. You can't tie them in, first off it always shows, secondly, you need to pick up the main color again in two rows, so don't tie the new yarns in!


Have a great day!

Thursday, February 10, 2011

Knitting: Two Colors, Same Row, Continental Method


As I promised a post on how to use two colors in the same row without making the backside look like the inside of a sweater. In the videos you will see me working a different project - same technique though so don't fret.


The photo above is the washcloth swatch I did showing the front side. Notice there are two types of red and white rows. One looks like heathering the other is like stripes. You can do it one way or the other through out your work. If you want the heather look, make sure you purl the opposite color into the stitch you are picking up. For stripes always use the same color. If you cast on an odd number of stitches and do stripes, the color you start with is the color you end with, you can alternate in the next two color row or keep it the same through out, that makes both edges of your work the same color, a nice look.


Practice this pattern on a washcloth sized swatch using cotton yarn - Sugar and Cream is a good choice. This is a good time to practice what the two colors worked as stripes or as rows looks like.


Pick up three solid colors, decide which will be a stripe all on its own "A" and which ones will make the two color rows "B" & "C".


Decide if you like the two colors to make stripes in their row or if you like the heathered row. Or like I said before, this could be a great place to practice.


Cast on 35 stitches with A


Rows 1& 2 K1 with A, rep. to end


Now you add both B & C,


Make a shortish tail 2-3 inches, hold both yarns as you usually do for a knit stitch and


Row 3 K1 with B, *K1 with C, K1 with B* rep. from to the end. As you work the two colors always move the just worked yarn to the front of the new working yarn just behind the needle. (See video below)


turn your work and prepare to purl. If you want stripes with your two colors always purl the stitch with the same color. If you want the colors heathered always purl the stitch with the opposite color.


Heather Row 4- P1 with C, *P1 with B, P1 with C* rep from* to the end.


Stripe Row 4 - P1 with B, *P1 with C, P1 with B* rep from* to the end.


Twinning the yarn like this does make it wind around itself, but when we purl stitch it goes backward and undoes itself. Knit winds it one way, purl winds it the other way.


On a washcloth sized piece it is no big deal, you knit the row with the two colors, turn your work, purl the next row with the two colors and out all the twinning comes!


When you do a bigger project like the afghan it is a lot of twinning up, to make it not so much and to help keep the twisted yarn out of my work way, half way through the first knitting with the two colors, stop and un wind the two working ends of the yarn. Then continue to the end, turn your work and begin the purl row with the two colors. Half way in the row all your twists will be un-twisted and you'll begin twisting the opposite way until your done with your purl row. But we'll talk about that again when we get to the whole afghan thing.


Rows 5 &6 K1 with A, rep. to end.


Okay, that will help you get started with your practice swatch dishcloth. I will post a Part Two when we're ready to get you started on that afghan.

Sunday, February 6, 2011

Yellow Beef on Greens


Super Bowl Sunday and I told our hosts for the day that I would handle the food. They have the tv connection and the room, I can do the food.


I racked my brain for food that would fit the day, Green Bay Packers style.


It needed to be beef - you know, meat packers. But I didn't really want to actually use canned meat the likes of which was sold under the label Council Meats by the Indian Packing Company. But thinking of the qualities that canned beef would have, soft, fall apart-ish, in a tasty liquid, chuck roast came to mind.


The Leonards, where were off to today, are on a lean and green program, the Vick's should be to. Well 'cept for that fat isn't bad, it is actually good and a person should eat a full color wheel of veggies in a day not just green, but you get my drift. Dinner needs to be healthy. Hard to come by on Super Bowl day.


We, the Vicks, have been eatin' a lot of soup lately and the last game that we took in at the Leonard's was accompanied by soup, I wanted to avoid any connections to that sad day (Seahawks lost to Chicago).


I wanted to incorporate the concept of the main meal with at least one of the snacks. I knew that I had a big bag of edamame in my freezer, which got me to thinking about a tasty beef dish that was served at a restaurant that brought a little plate of salted steamed edamame before your dinner much like the Mexican restaurants bring chips and salsa. The edamame were tasty and so was the beef. The beef was put on top of fresh spinach, pretty interesting.


Problem, I don't want to go to the store. I know if I look up a recipe for Thai beef I will end up going into town.


So I invented what I thought would be a wonderful flavorful beef and be okay for the Swede I'm married to.


Yellow Beef On Greens


Chuck roast or chuck steak: enough for your group. I used about three to four pounds worth, uncut, bones and all into an oval crock pot with enough water to not quite cover the meat.


Soy sauce - about a half cup, this is an adjustable things as some folks need the sodium and a few folks could use a little less


Lemon juice - one whole fresh squeezed


Minneola orange - (sounds like Minnesota huh and that's close to Green Bay, rivals actually) one or two whole fresh squeezed


Tumeric - ground, a generous tablespoon really generous (okay, truh be told, I dumped)


Cardamon - ground, about a tablespoon


Chili Garlic Sauce - a Vietnam product from the local store.


Onions - if you like 'em, put 'em in, lots, they have lots of sulfur and are high on the anti-inflammatory list, way high, so use lots, you'll feel great.


Sunshine Squash or similar kabocha or Butter Cup Squash puree - two cups, or more if your folks like squash, at two cups you can't even tell it is in there.


By this time time your big crock pot should be full.


Let all of this stew in the crockpot until the meat is tender, like canned meat would be if that was what we wanted to use.


Mean while prep the greens for the bed. I was going to just put this all on a bed of fresh baby spinach greens, the heat from the beef will wilt some leaves and some leaves will stay crisp. But I didn't have enough baby spinach so I did half and half spinach and shredded Chinese Cabbage. Toss them together, when it is time to serve, spread a generous double serving (do you know how many veggies your supposed to eat in a day?) on each plate, the beef and sauce will go on top. Once all is soft, lift the meat out of the juice, remove bones and fat globs from the meat and chunk the meat up. Hold it in a serving bowl that will help keep it warm.


Take two cups of the liquid put it in a sauce pan on low medium heat. (If you like spicey intense flavor, use four cups of the liquid, turn it on high and reduce it to two cups then continue).


Mix two tablespoons arrowroot powder with a fourth cup cold water till smooth. Slowly stir into the hot beef liquid. When it is thick mix into the beef.


Spoon the beef over your beds of greens, add a scoop of brown rice on the side (2/3 cup). Terry had some little green onions, so I minced those and we sprinkled them on top of the plate when everything was on it.


Incredibly anti-inflammatory with the squash, tumeric, onion, garlic...


This will be great if the Packers WIN.

Thursday, February 3, 2011

Meatloaf

Oops totally forgot about this blog. Well not completely, I just forget about it during appropriate hours. Hopefully I will quite forgetting.

So today we're havin' meatloaf and some Sunshine from the Oven. I was just telling Bet that my mom made meatloaf so often that she never needed to pull out the recipe. I only know that the basis for her meatloaf was Quaker Oats' Prizewinning Meatloaf because when I was a young girl wanting to help out it was this recipe that she pulled out of the drawer where she kept all her recipes: clippings, scraps of paper, recipe cards, magazine pull outs, Joy of Cooking, a particular casserole cook book with a recipe for Vim and Vigor soup written on the inside cover, and a few stray cookbooks of fair regard.

But the apple doesn't fall far from the tree, my mom "adjusted" recipes all the time and so do I. The trick is to knowing how and being able to swallowing your mistakes.

The original recipe calls for tomato juice, it is not an ingredient I have on hand. And as far as from Bethel's kitchen (Bethel is my mom by the way) it would more likely have been V-8 juice anyway and that right there my friend is a big flavor change up. So here goes Lanny's version:

To a pound of burger add
1/2 to 3/4 cup of rolled oats, you know it is difficult to buy exactly a pound of burger so adjust oats to suit (if you are using regular instead of quick cook up the liquid just a tad and let it sit before tossing it into the pan or even before you shove it in the oven.
1/4 cup of chopped onion - or just whack up a whole onion if it is about mediumish size, if you use a whole one of the giant softball size walla wallas or vidalias you'll have onion loaf instead, but if you've got a regular sized onion use it all, there ain't nothin' more difficult than hangin' on to half an onion in your frig.
1tsp of salt
1/2 tsp of fresh cracked pepper
1 cup of Tomato juice if you've got it. But if you don't don't stop, use half a little can of tomato paste, the balance in water to make a cup of liquid plus a good sturdy shot of lemon juice (hence a little less salt than the original recipe).
1 beaten egg

Feel free to toss in whatever herbs and spices you have a hankerin' for. You could make this with more of an Italian feel with Italianish spices, you could make it taste like sausage loaf if you put in sage and thyme sort of herbs, or heck even put a little sausage in it (we did that tonight, one mild Italian link from Costco). Or make it a steak house meat loaf and part of your liquid exchange could be A-1 or bbq or worchestestesire sauce.

Squish your final product together with your hands, there is no other way to do this, don't put latex medical gloves on, nobody wants to eat Dentist Chair Meatloaf tonight, get your hands slimy, I'm sure you washed them before you started and you can wash them later.

Bethel always made her's in a 9x13 pan (she cooked for eight so she doubled her recipe) not a loaf pan, it made the outter edges crispy and let the fat drain off, a bit. I put mine on a stone ware bar pan if I make two loafs or I put one loaf in a square cake pan (usually the stoneware one).

Mom always put two strips of bacon cut in half cross ways over the loaf and a swirl of ketchup. Trust me, it is worth it to put even just one strip on. She was even know to put sugary saucy concoctions on the top and man oh man did they make a tasty crusty meatloaf.

Bake it at 350 for an hour to an hour and a half depending on the meat thermometer that you stick in it. And like most things fresh from the oven let it sit a bit before you hack into it. Enjoy.